Archive for the ‘SnTT’ Category

SnTT: In Situ Domino Server Rename

Thursday, October 1st, 2009

One of the benefits of Domino server upgrades, when compared to some other emails systems, is the ease with which it is possible to perform upgrades in situ, without having to migrate to new hardware.

So with this in mind, it came as somewhat of a surprise to discover that when renaming an existing Domino server, Lotus actually advise that “The easiest way is to create a new server and move all users, databases, and needed functions to the new server using the AdminP task”.

Whilst I agreed that this approach is certainly appropriate if you are renaming a mail, or other user facing server (in order to maintain service availability), however if you need to rename a hub, or other non-user facing server, there is absolutely no reason why not to perform a very simple in situ upgrade as detailed below:-

1. Register the new Domino server name in the normal way

2. Add the new Domino server name to DNS (I assume the OS host name will remain the same)

3. Review and update the new Server Document, comparing it with the original server. This should include (but is not limited to):
– Directory Assistance
– Directory Catalog
– Transaction Logging

4. Create a new Server Configuration Settings Document for the new server, and copy across any necessary settings from the original server’s Configurations Settings Document

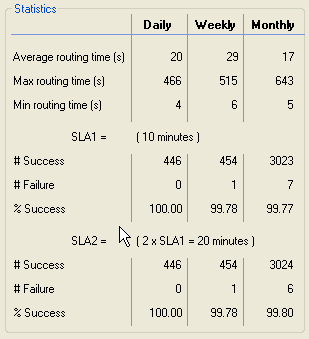
5. Review events4.nsf and create new probes and monitors for the new server as required, based on those configured against the original server

6. Review all mail routing and replication Connection Documents for the original server and create equivalent documents for the new server (as appropriate)

7. Review Program Documents for the original server and create equivalent documents for the new server (as appropriate)

8. Add the new server name to any relevant ACL groups in the Domino Directory

9. Add the new server name to the relevant DDM collection hierarchy (if appropriate)

10. Take a local (i.e. to your workstation) non-replica copy of catalog.nsf (for future reference)

11. Immediately prior to starting the actual rename process on the original server:
– Force AdminP to process any pending requests using tell adminp process new
– Force routing of any pending emails, ensure that there is no undelivered mail in any mail.box
– Force a database cache flush using dbcache flush

12. Shutdown Domino in the normal way

13. Take backup copies (outside of the Domino Data folder) of the following files:
– notes.ini
– server ID file
– log.nsf
– catalog.nsf
– busytime.nsf, or clubusy.nsf (as appropriate)
– all mail.box(es)

14. Delete the following files:
– original server ID file
– log.nsf
– catalog.nsf
– busytime.nsf, or clubusy.nsf (as appropriate)
– all mail.box(es)

15. Copy the new server ID file to the existing server

16. Edit notes.ini as follows:
– Replace any instances of the original server name with the new one name. Typically for the settings: mailserver and servername
– Edit the serverkeyfilename setting to reflect the file name of the new server ID file

17. Start the newly renamed server, ensuring that it recognises it’s new name and check the console and log file for any unexpected errors

18. Verify that you can access the new server from a Notes Client, and a web browser (if appropriate) using it’s new Domino and DNS name

19. Update the ACLs and Administration Server Database property of all server specific databases on the server, to reflect the new server name (making use of the previously saved catalog.nsf to help identify appropriate databases)

20. Review the directory assistance database (if applicable) and update any instances of the original name with the new one

21. Review any application databases and update the ‘run on server’ agent settings to reflect the new server name (if appropriate)

22. Decommission the original server from the Domino Directory (and of course DNS) in the normal way

Please let me know if you think I’ve missed anything, or if you have any suggestions on how to improve this process.

Enjoy!

SnTT: Confirm OTA Message Delivery to Blackberry Devices

Thursday, May 22nd, 2008

Have you ever quickly needed to check whether or not, a Blackberry device is active and successfully receiving mail over-the-air?

Well you can, by simply adding <$Confirm> at the very start of a message subject line, and sending it to the email address that it is associated with. Upon receipt at the device itself, it will send back a return receipt, similar to the following example:

Your message:

TO: xxxx.yyy@xxx.com
Sent: Thu May 22 07:35:32 2008
Subject: <$Confirm> Return Receipt Confirm Test

has been delivered to the recipient’s BlackBerry Handheld.

PS You can also use the following variation on this, but I’ll leave you to work out how this differs:

<$Confirm,RemoveOnDelivery,SuppressSaveInSentItems>

Enjoy!

SnTT: Nested Group Display Behaviour in Sametime

Friday, April 4th, 2008

For those of you who are not already noticed, Sametime Connect Client 7.51 or later (and also the embedded version in the Notes 8.0.1 Client), only displays server groups (from the Domino Directory) as a single concatenated level. As a result, any nested groups or sub-groups within it, are automatically ‘expanded’ into their (unique) constitute members and the merged result displayed. This is useful.

Conversely, user defined ‘local’ Sametime groups, are permitted to contain one additional layer of collapsable groups to be displayed. This is also useful.

So, how could these two differing behaviours be beneficially used?

Many organisations make use of nested groups and sub-groups, to create an hierarchical structure for organisational, departmental, or even functional mailing purposes. Often these individual, and sometimes unrelated, sub-groups, contain ‘duplicate’ names, which when added as individual buddy groups in Sametime, results in multiple entries (in different groups) for the same individual. So, by using a higher level nested server group, containing multiple sub-groups, it is possible to have a single collapsable section for all (unique) Sametime users in a particular department etc., or even perhaps, for an entire organisation.

Local Sametime groups can be used to save screen real estate and allow sets of multiple server groups to be brought together into a single collapsable section. This is achieved by simply creating a local Sametime group and adding the necessary multiple server sub-groups or even groups to it.

SnTT: Busytime, Mail-in Database Calendars and Upgrading from ND6.x

Thursday, March 6th, 2008

If your organisation is planning an upgrade from ND6.x and uses Mail-in Databases (based on the standard mail file template) for room or resource calendars etc., then beware that in ND7 and later, Busytime has undergone a very subtle but important change . . .

Now, instead of processing both Mail files and Mail-in Databases, in ND7 and later, Busytime will only processes the former. This means that following any upgrade, Busytime information will no longer be collected and displayed for Mail-In Databases.

To prevent this potential issue from occuring, simply create a new Person Document using the the same name, file path etc., as per the original Mail-in Database Document, and then delete the now superfluous Mail-in Database Document.

SnTT: PlanetLotus on your Notes 8.0.1 Sidebar, without using RSS

Thursday, January 24th, 2008

One of the great new features in the new Notes 8.0.1 Client, is the “My Widgets” sidebar add-in. This enables web pages, or even Notes Views, to be easily rendered in a sidebar panel.

However because we are displaying information in a sidebar, we should endeavor to ensure that it’s content is concise and in particular, not too “wide” for a normally sized sidebar.

To my mind, the quickest and easiest way to achieve this for web pages, is to make use of readily available content, that has already been optimized for mobile devices and one such good example, is the mobile version of the highly addictive PlanetLotus. The following screenshot shows what it looks like once it’s been added:

full_sidebar.png

So, to actually add our new PlanetLotus sidebar panel, we simply select the Get Started… option from the My Widgets sidebar panel drop-down menu, and leaving most of its Wizard screens at default, simply add the the URL of the mobile version of PlanetLotus (http://mobile.planetlotus.org), when prompted to enter the Web page by URL: as per the following example screenshot:

url_dialog.png

Then continue hitting Next on each of the remaining Wizard dialogs, until you have no option left but to Finish.

So now all that is left, is to open your newly created Widget (from the My Widgets panel) and use just it as you would any other sidebar panel. Hint: Once in the PlanetLotus panel, use a combination of the PlanetLotus preview hotspot and the backspace key to easily navigate around its content.

Enjoy!

SnTT: Is There a Problem with Internet Mail?

Friday, January 11th, 2008

Okay Admins, how many times have you been asked this question and what do you do to test it? Immediately drop everything that you’re doing and quickly send a couple of test emails in/out to your personal Internet email account and then take any necessary corrective action if required?

Whilst that works, wouldn’t it be way more efficient if you could proactively monitor Internet mail 24/7 and automatically raise alerts if there is a problem, plus also produce availability stats, and all from the comfort of your internal Notes environment? Now I fully realise that you cannot monitor every single email, but if you periodically send and monitor receipt of, a token message every few minutes, then that would certainly give you a nice warm indicative feel for exactly how Internet mail is performing and more importantly, flag potential issues before they become problems.

Well you can and quite easily, with the aid of a very useful third party commercial application called GSX Monitor, which is specifically written for Notes/Domino environments (there maybe other suitable applications). Amongst its many supervisory/reporting/alerting functions and capabilities, GSX Monitor can monitor server/network availability, database replication, Domino/BES/Sametime server tasks plus internal Notes mail routing. And it is this last item that we will focus on here, as it is provides all of our required core functionality, to which we simply need to add the ability to monitor external SMTP mail.

GSX Monitor monitors Mail Routing by regularly sending ‘coded’ emails to a nominated target email address and deposits them into the router mail.box of a source server. Notes then routes the message to its destination address in the normal way and after a pre-configured (SLA) time, GSX Monitor then checks the target’s mailbox for the relevant emails, where it logs the delivery times and then if the SLA criteria has been broken, can optionally raise an alert.

Alas things are not always that easy, even with commercial software, and one “limitation” of GSX Monitor, is that it requires a direct network connection (NRPC) to all of the Domino servers that it monitors. Furthermore, Notes attempts to route mail intelligently by its shortest path, which is kind of a problem when monitoring external Internet mail, as you would need two Domino servers, with different Internet Mail Domain addresses and external SMTP connectivity, in order to fully test both inbound and outbound Internet traffic.

My solution to this issue is really quite obvious and very easy to implement at little or no cost (apart of course from GSX Monitor!). . . Simply configure GSX Monitor to send its test emails out to an externally hosted POP/IMAP account, which is inturn, configured to auto-forward or redirect it, back to a nominated internal account, which GSX Monitor can then monitor as its target mailbox!

As for the POP/IMAP mail hosting, it is best if it supports auto-forward/redirection of the entire message and for this, I currently use and highly recommend, 1&1 Internet. Although in the past I’ve also successfully used bigfoot.com and I suspect that it might also work with GoogleMail (although I’ve not yet have the opportunity to test this).

The following diagram outlines the end-to-end process which will hopefully make more sense:

gsxdiagram.PNG

The following is an example of the Mail Routing stats that GSX Monitor automatically outputs:

gsxstats.png

Oh, one last thing. don’t forget to ensure that the address which GSX Monitor uses to send its emails, is enabled for sending Internet mail, and also that it is added to any SMTP Whitelists in your environment, in order to prevent the test messages falling fowl of any anti-spam/spoofing policies that your company may have implemented.

SnTT: Preventing Sametime Users from Accessing Hidden Groups

Thursday, November 22nd, 2007

This SnTT is a Sametime related follow-up to an excellent SnTT posting a short while back, by Paul Mooney, entitled Preventing users from mailing specific groups.

It’s a great tip. However if you share your Domino Directory (and its hidden groups) with your Sametime Server, then I recently discovered a potentially nasty caveat in using this technique, which I think is important to share, particularly if the members of these groups are private and confidential, such as for example, client email addresses.

Basically, whilst these groups are effectively protected by Readers Names fields which prevents (unspecified) Notes users viewing or accessing them. Sametime totally disregards this and as a result, allows not only the names of these hidden groups to be browsed, but perhaps more importantly, for their members names to be easily viewed.

Without changing the method of providing this hidden group functionality, or perhaps even changing the design of the Domino Directory, the only workaround is to use a selective replication formula on your Sametime Servers’ Domino Directory, in order to prevent these specific documents from replicating across.

For example:

SELECT !(@UpperCase(ListName)=”HIDDEN_GROUP_NAME” & Form =”Group”)

If anyone has any alternative ways of dealing with this issue, then I’d love to hear them . . .

SnTT: Notes Document Structured Text Export

Thursday, November 8th, 2007

Ever been at a users machine and needed to export the field text (minus any rich text attributes), of one or more selected Notes Documents, from any native Notes application, but you didn’t fancy using the Document Properties box and cycling though each document, one at a time, copying and pasting?

Well, if you can select the document(s) in a view, help is at hand, by exporting them into structured text and all from the comfort of your regular Notes client, in just three easy steps . . .

1. Open the necessary view and select the required document(s) in the normal way.

2. Select File, Export… and specify a name for your export file. Ensure that Structured Text is selected in the Save as type field – this is very important, as selecting any of the other possible types may, depending on the application, result in an export of view column fields rather than the document(s) itself – and hit Export :-

p1.jpg

3. Now select which options you require. I usually only pick Selected documents and hit OK to begin the actual export :-

p2.jpg

The resultant text file can be opened with a text editor in the usual way. Here’s an example, extracted from an ND8 Contact Document, which I exported earlier :-

p3.jpg

I find this technique particularly useful when examining the mail message routing information (including Internet MIME) of multiple messages, or when trying to track down some obscure field related bug.

Additional information regarding exporting documents into structured text, can be found in the Notes Client Help.

Apologies to those old hands who already knew this tip, but it’s often been useful to me and I felt that it just had to be given it’s five minutes of fame.

Enjoy!